
Every bowhunter wants to experience that moment of releasing the perfect arrow, watching it fly like a laser beam, and seeing it hit precisely on target. This is, after all, the apex of bowhunting. But to achieve this, your bow needs to be tuned to shoot your broadhead-tipped arrow properly.
Broadhead tuning requires good shooting and patience from you. But, it’s not all that complicated. In order to get my 2024 hunting setup tuned, I hit up Scott Einsmann, who is OL’s executive gear editor, a former archery instructor, and my informal archery coach. He shared the details on how to tune your hunting bow when you’re just an average archer like me, with no bow press or deep knowledge of tuning.
I followed Einsmann’s tips and got my bow shooting both mechanical and fixed blade broadheads just as accurately as it shoots field points. Here’s how I did that.
Step 1: Basic Set Up
First, your bow must be set up properly. Think of this as an ideal starting point for easy tuning. Before you move on to paper tuning, check the following details:
- Center shot is set at 13/16 inches (measured from the riser to center of the arrow shaft in the rest)
- The nocking point is level with the rest
- No nock pinch (the arrow should have a little space in the D-loop)
- No cam lean (here’s what you need to know about cam lean)
- Even cam timing
- Arrow properly spined with enough fletching on the back (a 2.75 inch vane for 3-fletch arrow should be enough for most fixed blades)
- Arrows and broadheads are spinning consistently with no wobble
If your setup is out of whack on any of these checkpoints, then any other adjustments you make won’t fix the problem. In fact, you could be slipping down a tuning rabbit hole by over adjusting your rest, for example, rather than fixing the core issue.
So, you should only move on to paper tuning after you’ve got your basic setup dialed.
Step 2: Paper Tune Field Points
The idea here is to shoot your field-tipped arrow through a sheet of paper (from about five feet away) to ensure that it is flying straight when launched from the bow. I did this by hanging a big roll of paper in my garage and propping my target on top of a couple boxes behind it. It looked plenty redneck but it worked just fine. The key is to make sure that you’re aiming level and square to the paper (not shooting at a downward angle, for example) and that you’re executing good archery form. If you’re death gripping your bow and inducing torque, you’ll still see wonky arrow flight no matter how good your tune is.
After you shoot a field-tipped arrow through the paper into the target behind it, you want to see a perfect bullet hole in the paper (see below). If you have your rest and nocking point set properly, you might get that right away. But there’s also the chance that you have a tear in the paper that reveals suboptimal arrow flight. In this case you will move your rest, nocking point, or cams ever so slightly. I had the benefit of shooting a Bowtech Core SR, which has a “Deadlock” feature that allows you to shim the cams left or right without a bow press. This allows me to maintain 13/16 centershot on my rest and still make cam adjustments to paper tune to a bullet hole. If your bow also has this feature, it’s better to shift the cams then it is to move the rest.
Regardless, don’t move the rest more than 3/16 inches in any direction. If your bow won’t shoot a bullet hole through paper with a slight adjustment, then something is wrong and you need to go back to Step 1. Here’s how to tweak your bow with the following tears.
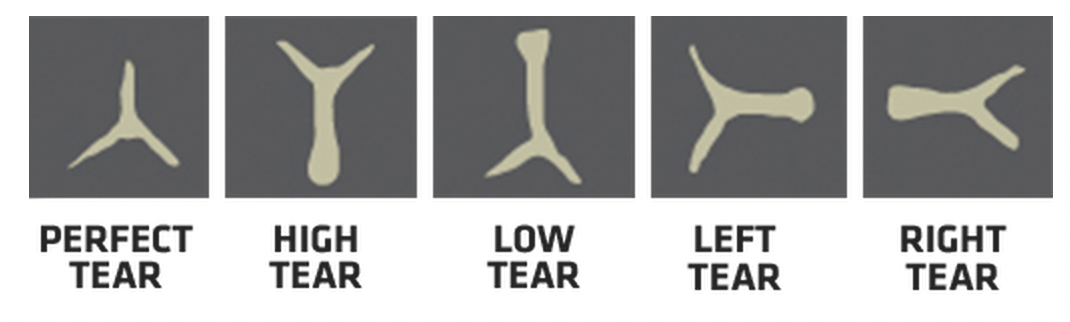
- Perfect tear: Don’t move anything.
- High tear: Move the nock point down or the rest up.
- Low tear: Move the nock point up or the rest down.
- Right tear: Move the rest toward the riser or move the cam to the right.
- Left tear: Move the rest away from the riser or move the cam to the left.
- If you have a horizontal and vertical tear, then fix the vertical tear first.
In order to get the most out of this process, you need to make sure your bow is set up just the way it would be when you’re hunting (quiver on, stabilizers fastened). As a bonus, you could also bare-shaft tune, which just means shooting an arrow with no fletchings through the paper and tweaking until it produces a perfect bullet hole. Einsmann doesn’t recommend this step for most average bowhunters, however, since small errors in form can lead to inconsistent tears, which leads to chasing false trails while tuning.

Photo by Alex Robinson
During my paper tuning I had a slight nock-high tear. Einsmann says a slightly high or slightly left tear for a right-handed archer is OK, but a bullet hole is always best. So I moved the rest up slightly and started shooting bullet holes. Then I was ready to start slinging broadheads.
Step 3: Broadhead Tuning

Photo by Alex Robin
Now you get to see how good of a job you did on paper tuning. The goal here is to have your broadheads hit the same point of impact as your field points. To do this, you’ve got to have a solid understanding of your own baseline accuracy. For example, I know that when shooting from 20 yards I can hit the 2-inch square on my target almost every time. From 50 yards I’ll consistently keep arrows within the 5-inch circle on my target. So, when shooting my broadheads, I’ll expect the same results.
So first, go to 20 yards, shoot a broadhead and then shoot a field point. Aim at the same point on your target for both shots and execute your best archery form. Evaluate where your broadhead hit versus your field point. Repeat this process two more times.
- If your broadheads and field points are grouping together, great. Move back to your farthest comfortable shooting distance and shoot the same sequence again.
- If your broadhead consistently hits right of the field point, move your rest or cams slightly left. Make small adjustments at a time and if you’re moving cams, make equal adjustments to both cams.
- If your broadhead consistently hits left of the field point, move your rest or cams slightly right.
After moving your rest or cams so that the field points and broadheads hit together, you’ll likely have to move your sight to get back on target. Once you’re totally dialed in at 20 yards, move back to your farthest comfortable shooting distance and make sure the broadheads and field points are grouping together from long range as well. If they are, then you’re ready to hunt.
During my broadhead tuning process both my Sevr mechanical broadhead and my Iron Will fixed-blade hit right beside my field point. In fact, I smoked two arrows during the tuning process. Alas, sacrifices must be made in pursuit of the perfect tune.
Troubleshooting
It’s likely that you’ll run into some sort of hiccup during the broadhead tuning process. I noticed that I was getting some fletching contact with my drop-away rest and I spent more time tinkering with rest timing than with the actual rest position or the cam position. Just take your time and add an extra range session if you need to.
If you are having trouble getting broadheads to fly consistently and shoot accurately, Einsmann suggests going back to paper tuning. Try a bare shaft tune or try paper tuning from farther away (10 yards or so). Also remember that fixed blades can be more finicky than mechanicals, and at longer ranges they will have more drop than field points (because fixed-blade broadhead designs create more drag), in which case you’ll have to adjust your sight elevation.
There’s also the quick-fix option of screwing the broadhead onto a different arrow. Maybe the arrow you initially chose isn’t exactly straight and selecting a different arrow will solve the problem. I still believe in the old-school method of shooting a small handful of arrows with broadheads and then cherry picking one that shoots the best and most consistently out of the group. I’ll use a Sharpie to mark this arrow/broadhead combination with a “1” and use it for hunting. If nothing else, it gives me just a little extra confidence.
Final Thoughts on Tuning Your Bow for Broadheads

Photo by Alex Robinson
If your broadheads aren’t hitting with your field points, you might be tempted to just move your sight so that the bow is sighted in for broadheads and then call it good. That would work OK from a backyard accuracy standpoint (assuming the broadheads are flying consistently) but you would still have imperfect arrow flight. This means that your bow won’t be as forgiving as it could be, so it will actually be harder to shoot accurately during a high-stress hunting scenario. Plus, if your arrow isn’t flying true, it won’t penetrate very well, no matter how much poundage you’re drawing or what kind of broadheads you are shooting. Remember that an arrow must deeply penetrate vital organs and the broadhead must make a substantial wound channel in order for you to make a clean kill. With your bow tuned properly, it will do just that. The final step in the equation is simply good shooting from you.