
Travis Olander 02.02.23

We’ve covered how to put together a proper Individual First Aid Kit (IFAK). One staple of any good kit is a tourniquet. This live-saving piece of steel and fabric is used to stop arterial bleeding in extremities subjected to severe trauma. A tourniquet can come in handy just about anywhere, anytime: From a gunshot wound, an automotive or recreational vehicle accident, a workplace injury, or even a steep fall on a hike. But, applying a tourniquet isn’t as simple as throwing the band around a limb, cinching it down, and calling it a day.
Applying a tourniquet incorrectly can lead to death. If you ever find yourself in an emergency situation requiring a tourniquet, you’re probably going to be under extreme stress. Mistakes will be easy to make and difficult to fix. So, let’s go over how to properly apply a tourniquet and, more importantly, cover what you shouldn’t do when stopping a severe bleed.
Determine if a Tourniquet is Needed
Tourniquets can cause permanent tissue and vessel damage. In extreme circumstances, that could mean amputation of a limb is the cost of saving that life. A tourniquet shouldn’t be applied to a wound that’s superficial, or one that primarily affects fascia (that’s skin, fat, and subcutaneous tissue). If a non-arterial bleed can be stopped with light pressure, then it’s best to rely on clotting agents and a pressure dressing.
Importantly, you should air on the side of application if you aren’t trained. A tourniquet is unlikely to lead to amputation. This only occurs if it’s left in place for hours, so this should never factor into your decision to apply one. It’s better to lose a limb than a life.
If you’re witnessing a severe laceration, if the injured is struggling to remain conscious or appears to be in shock, or if you see heavy bleeding that’s bright red and bubbly, it’s time for a tourniquet. If in doubt, clamp it down.
Don’t Apply Over Clothing Unless Necessary
We covered why a good pair of trauma shears should accompany every IFAK: Clothing should be removed from the site of a bleed to expose the injury and surrounding limb. Tourniquets are more effective when not placed atop clothing. Heavy articles, like jeans and jackets, can inhibit a tourniquet’s ability to stop the bleed.
Don’t Apply a Tourniquet Near Joints
Applying a tourniquet near a joint does two things: It allows the bleed to continue, and it raises the risk of causing further injury to surrounding vessels and tissue. Apply the tourniquet at 3″ to 4″ above the affected joint. This ensures tendons and bone don’t inhibit the pressure needed to clamp arteries.
Don’t Apply a Tourniquet Atop The Wound
This may seem like common sense, but it falls under the category of, “This needs to be explained because it’s happened before.” Never apply a tourniquet directly atop a bleed. This won’t effectively clamp arteries. Heavy bleeding will continue with the added trouble of the improperly applied tourniquet now also forcing blood from the distal end of the limb back into the open wound. Follow the same rule as with joints: Always apply a tourniquet at least 3″ to 4″ above the site of the bleed.
If In Doubt, Apply It Higher
Traumatic injuries are messy. An injured limb might have multiple wounds, all of them bleeding to some extent. If you’re in doubt about where arterial bleeding is occurring, apply the tourniquet as high as possible on the affected limb.
If a Tourniquet Fails, Apply Another
Severe trauma – like a partial amputation or crushed limb – will result in extreme hemorrhaging. Even a properly applied tourniquet may fail to clamp all vessels. If that occurs, or if a tourniquet fails after a period of time, apply a second one higher up the limb. Space the second application at least 1″ to 2″ higher to allow the windlass to move freely. Never remove the first one, even if another is applied.
If Lower Limb Placement Fails, Move to Upper Limb
The lower halves of the arms and legs each have two bones. In the forearm, we have the Ulna and the Radius. In the calf, we have the Fibula and Tibia. Many first responders say that placing a tourniquet over these lower extremities can result in poor pressure, because these two bones can prevent arteries from being clamped. This writer (who spent years in the military learning about combat tourniquet applications) agrees with this argument. If a tourniquet placed over the calf or forearm fails, place the second tourniquet high up the limb. That means placing it 3″ to 4″ above the knee or elbow.
Use The Windlass (Not the Band) to Stop The Bleed
The windlass is the metal torsion ring that must be rotated atop the tourniquet to provide adequate pressure. It isn’t the act of cinching down the strap itself that stops hemorrhaging. The windlass is always responsible. That’s why they’re made of steel or solid polymer. Always rotate the windlass until the bleeding stops, and then give it one more half rotation before securing it.
Don’t Use a Belt Unless You Have To
A belt is not a good tourniquet. Period. If you’re properly equipped – as you should be, since you’re smart and invested in a quality IFAK like the Yellowstone Trauma Kit – then you’ll have a tourniquet available. An improvised tourniquet should only be used as a last resort. Even in such circumstances, you should try to fashion a tourniquet that has an improvised windlass.
Heavy cloth (like torn jeans) can be combined with any steel or solid metal item (like a butter knife) acting as a windlass to provide leverage and pressure. If you use a belt, you’ll have to rely on brute force to cinch down the fabric or leather. It’s difficult to maintain the necessary amount of pressure without a windlass.
Buy Quality Tourniquets (And Rotate Them)
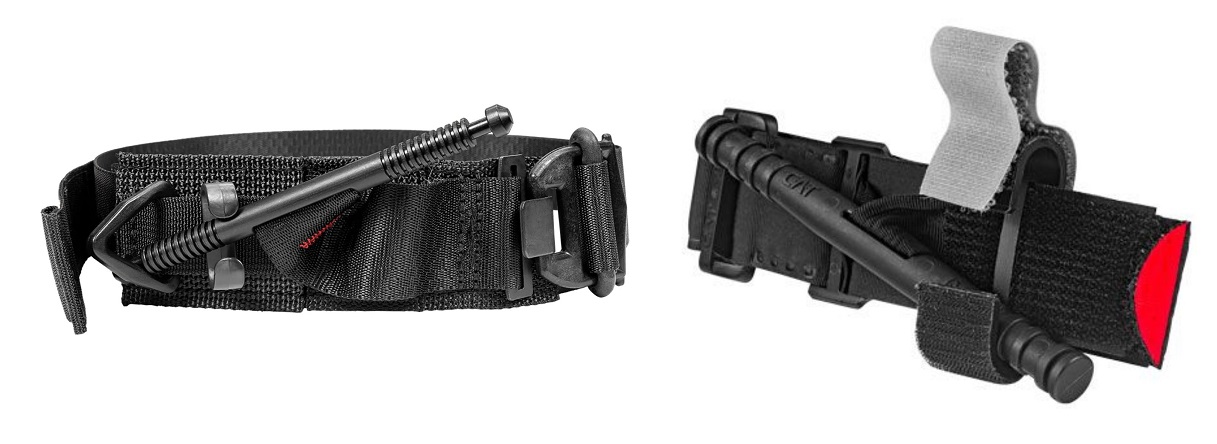
Two options come to mind: The SOF Tourniquet from TACMED Solutions, and the Combat Application Tourniquet from North American Rescue. These two bleed stoppers have been and continue to be trusted by law enforcement, military, special operators, and medical responders across the world. Investing in anything less is simply not worth the risk.
Even high-quality gear like these units will fail over time. You do not want to apply a tourniquet that has dry-rotted fabric, a broken or brittle windlass, or visible signs of tear. Tourniquets don’t have expiry dates, but they should occasionally be swapped out for new units. As long the fabric and windlass remain dry and free of damage and debris, it’s safe to say they’re good for at least two years.
