
CBI All Aluminum Lightweight Plate Front Bumper For 3rd Gen (2016-2023) Tacoma – Detailed Install Guide, Review & Overview
When it comes to upgrading your factory front bumper there are a few key benefits to think about.
- Adding a level of protection to the front end of your truck whether you’re on or off-road.
- Gaining more front-end clearance which will increase your approach angle.
- Adding more accessory mounting locations to the front end of your truck.
- Offroad bumper upgrades give you the ability to add a winch, and more off-road lighting to your Tacoma.
- They also have recovery points that are much easier to access compared to factory locations.

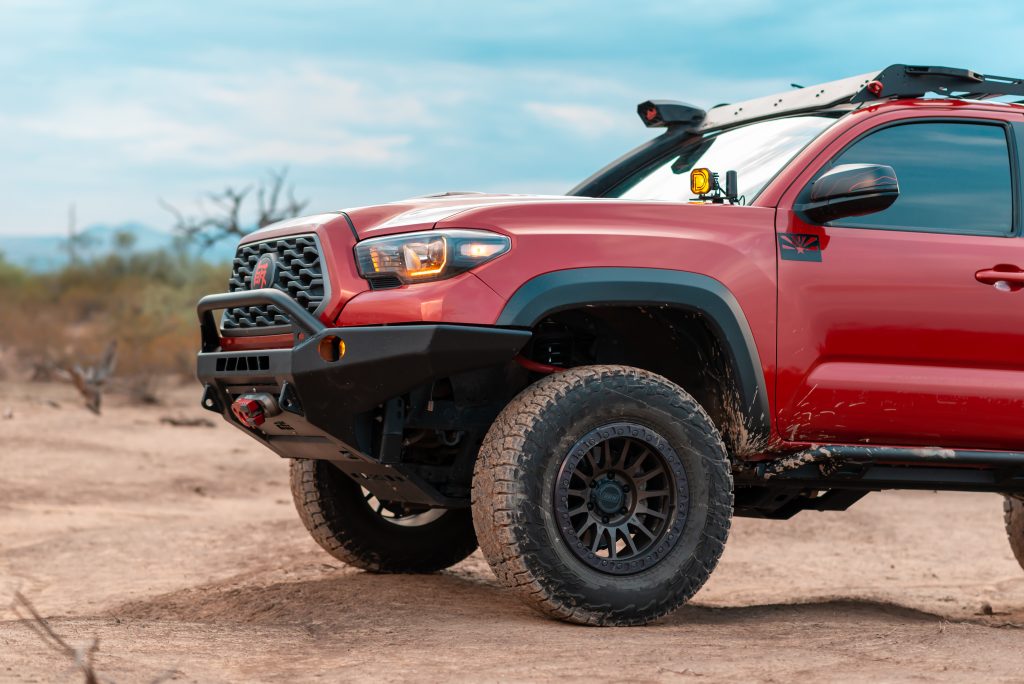
The Baja front plate bumper from CBI is (in my opinion) the best-looking offroad bumper on the market. CBI’s bumper gives you the option to add a winch, 20″ light bar, and you can retain your factory fog lights. I love how they designed their Baja front bumper to follow the lines of the Tacoma. The sides of the bumper curve around the front corners of the truck and line up perfectly with the factory fender flares. My favorite design feature is how the center of the bumper dips down below the grille following another factory body line.
CBI offers their front bumpers with the option to get them in either steel or lightweight aluminum (mine is aluminum). They also coms with 3 different bull bar designs but CBI uses different model names for each style.
The Classic front bumper comes with no bull bar, the Baja bumper comes with a low bull bar like the one I will be installing, and the Adventure bumper comes with a full-height 3-hoop bull bar.
Find It Online
CBI Baja Front Bumper For Tacoma
Installation

There will be some required cutting and a second set of hands will be really helpful here. If you get the aluminum version, it will be easier, but if you get a steel bumper then you really will need more than one set of hands. Follow along and use this article as your guide to help with installation.
FYI, I previously had a high clearance plate bumper, so there’s some trimming you will need to do if this is your first time. Or, I outline another alternative to cutting your bumper all together… stay tuned.
Tools Required
- 1/2″ ratchet
- 10mm socket
- 14mm socket or 14mm wrench
- Flathead screwdriver
- Push pin pliers
Features & Specs
- 110 lbs. steel / 55 lbs. aluminum
- Bare metal or black powder coat finish
- Compatible with 3rd Gen (16-23) Tacoma
- Winch compatible
- 20″ light bar compatible
- Fog light mounts for factory or aftermarket fog lights
- Grille and headlight protection
- Increased approach angle
- Designed with OEM body lines in mind
- Made in the USA
Disassembling Front End

As you can see above, I had the viper cut done to my factory cover and my liners are already trimmer higher. My flares are also trimmed from my old setup. Luckily, the CBI bumper will come to the same height.
To prepare for the removal of the front bumper we will need to remove the grille, and partially remove the front fender flares that attach to the front bumper. Lastly, there will be some screws and clips on the bottom side of the bumper that help hold the bumper to the truck. Since the bumper was previously removed I won’t have these.
Step 1. Removing Bumper Hardware

You will find multiple 10mm bolts on the bottom side of the bumper that help secure everything. After you remove all of these, the bottom portion of the bumper will be free from the truck.
Step 2. Removing Grille

To remove the grille you will need to use a 10mm socket and a set of push pin pliers. Above, the far left and far right arrows point to the plastic trim clips that are holding the grille to the truck. The center two arrows are pointing to the two 10mm bolts holding the grille in place. Using your socket, remove the two bolts and using push pin pliers pull out the two plastic trim clips.

There’s no special way to remove it except just pulling gently back on the grille, away from truck, and it should pop off of the truck. You can see in the photo above where there are multiple rectangle holes along the top edge of the bumper, where the grille clips in.
You won’t see two plastic air dams next to both of the headlights that you should have on your truck. Mine were removed, and are recommended to be removed for the install. They will easily come out by removing a few plastic trim clips. You can pull both of these air dams out and toss them, your truck should look just like mine.
Step 3. Disconnecting Fog Lights & Harnesses

Along the bottom edge of where the grille was, you will see clips that connect the harness to the cover. These clips just need to be popped out so you don’t rip this wire harness out when you pull your factory bumper off.
Right along with the clips for the wire harness, you will also see some black clips that are holding parts of the bumper to the truck. All of these can be removed too or the bumper will not be able to pull away from your truck when you attempt to. After you have removed all of the clips attaching the wire harness to the front bumper, you can also unplug the factory fog lights. If you leave these plugged in you will be ripping your harness and that will not be a fun day.
Step 4. Disconnecting Front Of Flares

You can see 2 slots on the bumper just below where the fender flare stops. You’ll have to pop these out to loosen the flares. On the back side of your fender flares, in the wheel well, you will see some 10mm bolts and a plastic screw that needs to be removed to pull the front of the fender flare away from your truck.
Once you remove the hardware, the fender flare is also held to your bumper and fender with small plastic clips. Be gentle with these clips and try not to damage them. You just need to pry the fender flare away just enough to pull the cover off when everything is disconnected.
Step 5. Removing Bumper Cover

Now that everything is disconnected, you can pull the entire cover off.
Work your hands around the bumper, until all the clips are released. Once you get to the headlight, the side of the bumper you are pulling on should start to come away from the truck. Continue around the whole bumper until it’s free. Separate the fog lights from the bumper and set aside (if adding them to your new CBI one).
Step 6. Removing Crash Bar

The front bumper core is made of an aluminum crash bar. It’s held on by six 14mm bolts. You can see three of them above. Remove them all.

Not sure if everyone has this issue, but my crash bar didn’t want to easily come off. It might not be the easiest way to do the job, but I used a ratchet strap to compress the ends so that it would all slide off easier. I was then able to remove the bar.
You could also just grab a big hammer and force it to come off that way. Your call.
Step 7. Relocating Power Steering Cooler
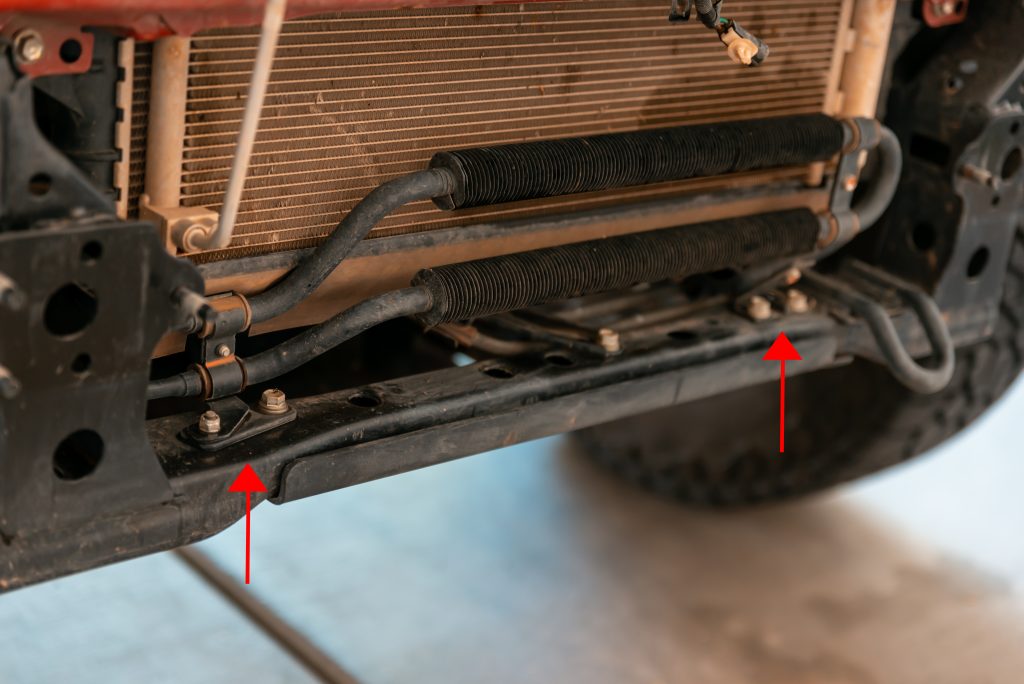
CBI includes some brackets with your bumper to move your power steering cooler back just a little. Your power steering cooler has 2 connections to the truck frame (seen above). Using the provided brackets, you will be able to shift this cooler back about an inch so the bumper works.

Don’t forget about this third bracket that is needed to move back your power steering cooler. You might need to move your splash guard out of the way to gain access. This bracket also needs to be moved with another relocation.
Step 8. Cut OEM Bumper Or Add R4T Caps

To install most aftermarket front bumpers, you are required to cut your cover. If you don’t want to cut up your truck then you have a second option, which is a much cleaner choice, in my opinion.
Runnin4Tacos makes what they call Tacoma front bumper caps. You can see them above. They come in primed or painted versions, I chose to get the color match.

The caps snap into place and utilize factory mounting points. If you choose to get these bumper caps then you won’t have to do any cutting at all.
If you go the route of cutting your bumper you will cut a line across both sides of your bumper right above the fog light pocket. After you cut, you will also have to cut your fender flares to match the horizontal line.
Step 9. Preparing New Bumper

The following attachments are all optional and depend on what you want to add at this point. I added my Diode fog lights, but you can also directly swap over your OEM fog lights. A bracket is provided for this.

CBI provides brackets that attach to your bumper so you have a mount location with a 20″ light bar. I went ahead and just attached this bracket so I’m ready in the future.
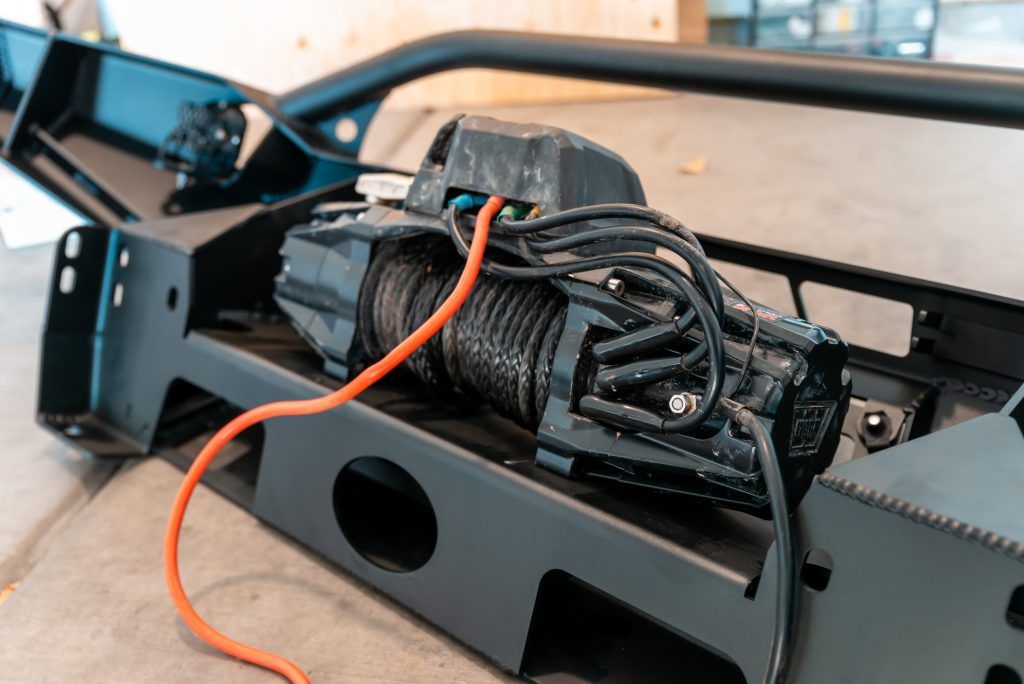
If you have a winch I would highly recommend getting it added before you install the bumper. I personally have a WARN EVO 10-s winch. Mounted up quick and easy with provided hardware.
To get the winch mounted, I installed all four bolts by hand just to get the winch aligned to the bumper. You will now need to take off the front plate to your bumper to gain access to the bolts. Flip your bumper over and there will be 6 silver Allen bolts that need to be removed to gain access to the underside of the winch plate.

Install your fairlead after tightening down the winch bolts and reinstalling the fairlead plate. Make sure to properly route your winch line.
Step 10. Mounting New Bumper

You might not need to do this portion, but my winch control box was hitting one of these supports. I had to use a grinder to trim down this bracket so my WARN winch would fit properly on my truck. The other option would have been relocating the control box, should you buy a winch with that option.

Lift the bumper onto the 6 main mounting points. You can ask for a second set of hands, or struggle like I did and use a floor jack (haha).
Grab the 6 nuts you removed earlier from the OEM crash bar and loosely install them all. Tighten them after only final adjustments to fitment.

Now you can move on to the bottom of the bumper, where the supplied hardware will add another mounting point for a stronger connection, and also help adjust the height up or down.

I ended up installing the bolts and nuts along with 5 washers between the bumper and the frame which set my bumper up for a good height for my liking. This setup gave my bumper just enough gap between the bumper caps and the bumper that they won’t rub and get damaged. The gap between the bumper and bumper caps is also small enough that you can’t really see through it and they look like they were designed together.
Step 11. Final Finishing Steps

With the CBI bumper now secured to the truck, I went ahead and took the extra step to clean up all of my wiring behind the bumper. My fog light harness and the wiring for my winch all got cleaned up and secured with zip ties to keep them out of the way and looking good – even though people won’t see this.
Keeping your wiring organized and clean is always a good practice to prevent wires from being damaged by unexpected moving if they aren’t properly secured.

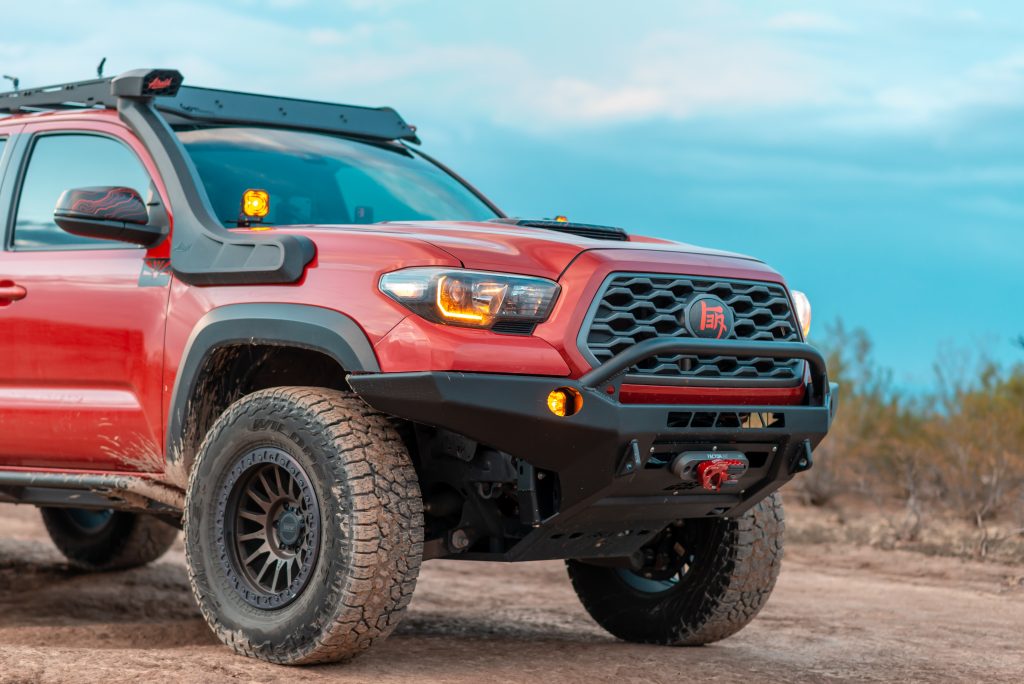
Usually, if you install an aftermarket front bumper with a bull bar you aren’t able to install or remove your grille after the front bumper is on. The CBI front bumper bull bar is set at just the right angle so you can install the front grille or remove it if you ever need to.
Align your grille to the front of your truck using the multiple alignment pins and gently press the grille into the truck. The grille will snap into the truck in a few locations which will secure it to your truck. At the top of the grille install the two black push pins and the two 10mm bolts we removed at the very beginning.
Final Thoughts

There are a lot of different options on the market when it comes to choosing a front bumper for your Tacoma. Out of all the front bumpers I have seen, my eyes have always been drawn to the style and design of the CBI Baja front bumper. I love how they created this bumper to flow really well with the design of the truck’s front end.
Upgrading to this bumper has given my truck a lot more front-end clearance which is a huge benefit on the trails. I was finally able to add a winch to my truck which gives me more confidence out on the trails when I’m alone and I also like knowing I have more tools to help myself or others who need to be recovered.
I haven’t installed a light bar yet but hopefully, soon I will be able to acquire a 20″ light bar which will give me more lighting to make night off-roading or camping easier to do. Not everyone enjoys all the lights on their rigs but I believe having a good amount of light can help you explore new things you have never tried, and they also give you more safety when hitting the trails. I always like to expect the unexpected and I try to prepare myself for anything. Then the last addition to the front end by adding this bumper to my truck is adding two D-ring shackles for recovery.
If you want armor paired with style, then getting a CBI Baja front bumper for your Tacoma will not disappoint you. This is now the second bumper I’ve had on my truck and I’m in love with every feature and the overall design. If you have any questions please drop me a comment below!