Yoga’s iconic half moon pose (ardha chandrasana), with its full-body shape and acrobatic balance requirements, is definitely Instagrammable—but its most profound benefits exist beneath the surface of its expansive outward appearance.
Though classified as a standing posture, half moon can also be considered a hip opener and chest opener. “One of the main benefits is that sense of opening through the whole body,” says Jivana Heyman, RYT-500, founder of Accessible Yoga. “It’s like the body is a five-pointed star and you can feel your energy and light expanding in all directions.”
This yoga for balance pose is also a powerful opportunity for us to practice acceptance over perfection. Sabrina Zellis, RYT-500, has been teaching for nearly a decade and she still topples over at times.
“Instead of looking at it as a failure or that I’m not ‘achieving’ the pose, I view it as an off day and laugh about it,” she says. In fact, what makes this pose advanced is less that it’s a single-leg exercise and more the deeper spiritual lesson of not attaching to the results of our efforts.
In addition to toning our legs and butt and improving balance, half moon teaches us to stay grounded, even as we reach for the stars. Chakrically speaking, our energetic roots begin at the base of our spine and extend through and beyond the top of our head. Half moon tips us on our side, asking us to find the elements of rooting and rising while free-floating in space—not unlike trying to get grounded on the moon.
Benefits of half moon pose
This balancing posture is a whole-body and whole-mind experience.
Improves balance
“Balance isn’t just physical; it also has a significant mental component,” explains Zellis, who is currently managing Coachella Yoga, Therapy, and Wellness in Palm Desert, California. “I’ve noticed that my ability to balance in half moon reflects the kind of day I’ve had—it’s a great indicator of my mental focus and clarity.”
“I’ve noticed that my ability to balance in half moon reflects the kind of day I’ve had—it’s a great indicator of my mental focus and clarity.”—Sabrina ellis, RYT-500
Improved balance can be especially important for older populations, who are at higher risk of injury from random falls (we provide supported variations of the pose).
Strengthens the glutes
The standing leg is responsible for supporting our pelvis, lifted leg, and torso as we balance. In order to support those structures, we must properly engage our glute group, which includes our gluteus maximus (bum) and glute medius (outer hips). “The front leg is the unsung hero of the pose,” says Zellis. “It’s like the conductor of an orchestra, leading the way for the rest of the body to follow suit.”
Boosts ankle strength
You know how wobbly your foot gets when you try to balance on one leg? That’s actually a good thing! It’s all of the muscles of your feet and ankles calibrating to help you find your center. In fact, wobble-boards are often used to help athletes retrain ankle stability after injury.
Improves core stability
Core stability is being able to move our limbs while our trunk stays steady. “While [half moon pose] is commonly associated with leg strength, there’s significant core engagement involved in maintaining the pose. After all, our limbs attach to the center of our body,” laughs Zellis.
May improve cardiorespiratory endurance
A 2015 study1 looking at the effects of yoga patients’ cardiorespiratory endurance (heart, lung, and blood vessel synchrony and health) saw significant improvements after a 12-week yoga intervention, where half moon pose was one of the poses taught to research participants.
How to do half moon pose
We’ve broken down the half moon sequence into a step-by-step guide below.
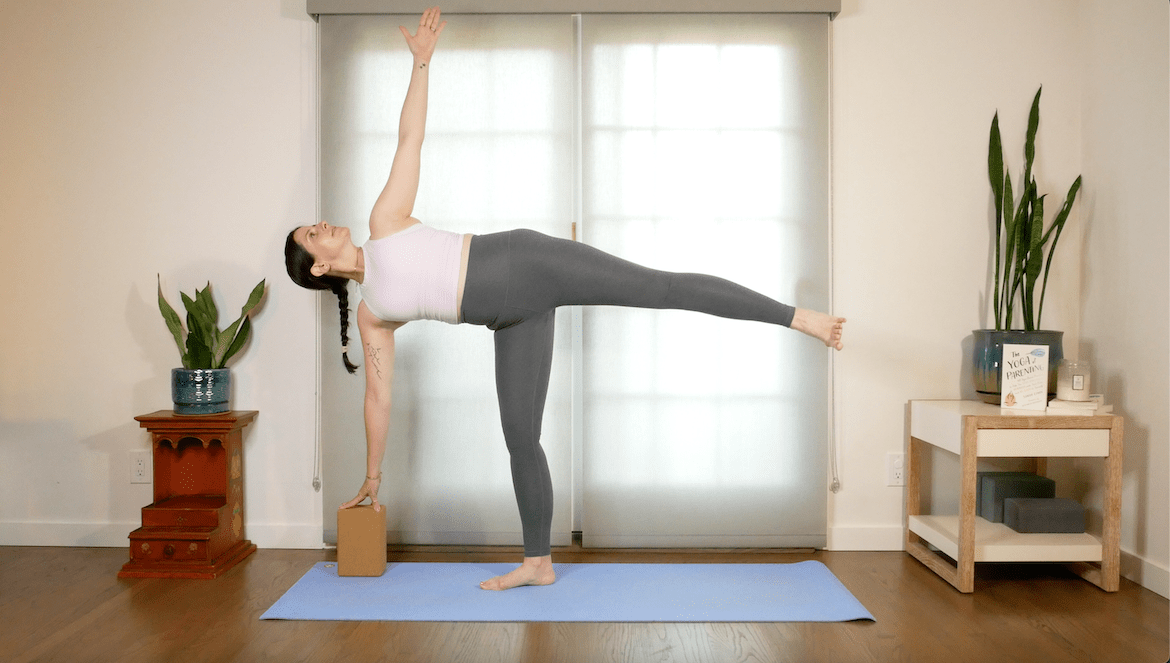
- Start in triangle pose with your legs three to four feet apart and your right foot and leg turned forward. Have your bottom hand on your outer shin or a block. Place your top hand on your hip to begin.
- Bend your right knee and walk your right hand in front of your foot a few inches. Use a block if it doesn’t reach the floor easily.
- On an inhale, lift your left leg toward the sky.
- Straighten your standing leg.
- Firm your front hip in and under, while you roll your chest open. It will feel as though you are leaning your torso open in space (you are!).
- Reach your top arm strongly upward (or keep it on your hip if balance feels challenged).
- Gaze at your standing foot or up to your top hand.
- Remain for seven breaths.
- To come out, bend your standing knee, move your bottom hand back next to your foot, and slowly step your left leg back, returning to triangle pose.
- On an inhale, press your feet to bring your torso upright.
- Parallel your feet and switch sides.
5 form tips to help you nail half moon
1. Prioritize your standing foot
“Focus primarily on the grounding aspect,” advises Heyman. “Grounding is that feeling of energy moving down into the earth.” Although, if your front foot is not well-aligned to begin with, no amount of grounding will help, points out Zellis: “If your foot veers off-course, it throws the whole party out of whack! It also puts unnecessary stress on your knee.”
2. Maintain a steady gaze
There is no “right” place to look—it’s up to your balance and need, as long as your eyes are steady. Some people look down at their standing foot, while others brave a peek at their top arm.
3. Energize your lifted leg
A lot of people get so caught up in stabilizing the standing leg, they forget about the lifted leg. The higher the lifted leg can lift, the lighter your standing leg will feel. That said, Heyman has noticed the focus on upward energy can be destabilizing for some folks, and reminds you to prioritize grounding first (see tip number 1!).
4. Energize your arms
The arms may look like a pretty add on, but they are actually a huge contributor to our equilibrium. The bottom hand acts as a second foot, while our top arm helps keep a sense of buoyancy in the upper body.
5. Stay focused
Keep your attention on your body and your breath. This can be a difficult yoga pose to master if you’re distracted. “I’m more likely to fall if I have a lot of stuff on my mind,” admits Zellis. Even if you are wobbling, as long as your mind is focused, you are doing the pose well.
“Even if you are wobbling, as long as your mind is focused, you are doing the pose well.”
Half moon pose variations
There are a variety of ways to make half moon pose more accessible— or more challenging—depending on your needs. Knowing how to modify a yoga pose is an important aspect of learning that your practice is for you, and not the other way around.
And don’t let the accessible variations fool you into thinking they’re “easy”! Working with items like a wall, chair, or block can sometimes make a pose more challenging—they act as truth tellers. It’s a lot harder to compensate and let your bum jut to the side or for your standing foot and leg to be off-kilter when you have a wall directly behind you.
It’s important to note here that there is another version of half moon pose taught in Bikram and a few other lineages, which is a side stretch. This is the version that teacher Hailey Kinter, known as @disabledyogi on Instagram, was taught and also teaches. Kinter shares a seated variation of that version below.
Half moon pose with back against wall
This is a great variation to enforce how much your standing leg and hip work to keep your lifted leg and upper body stable in this pose. The wall is also supportive if balance is a challenge.
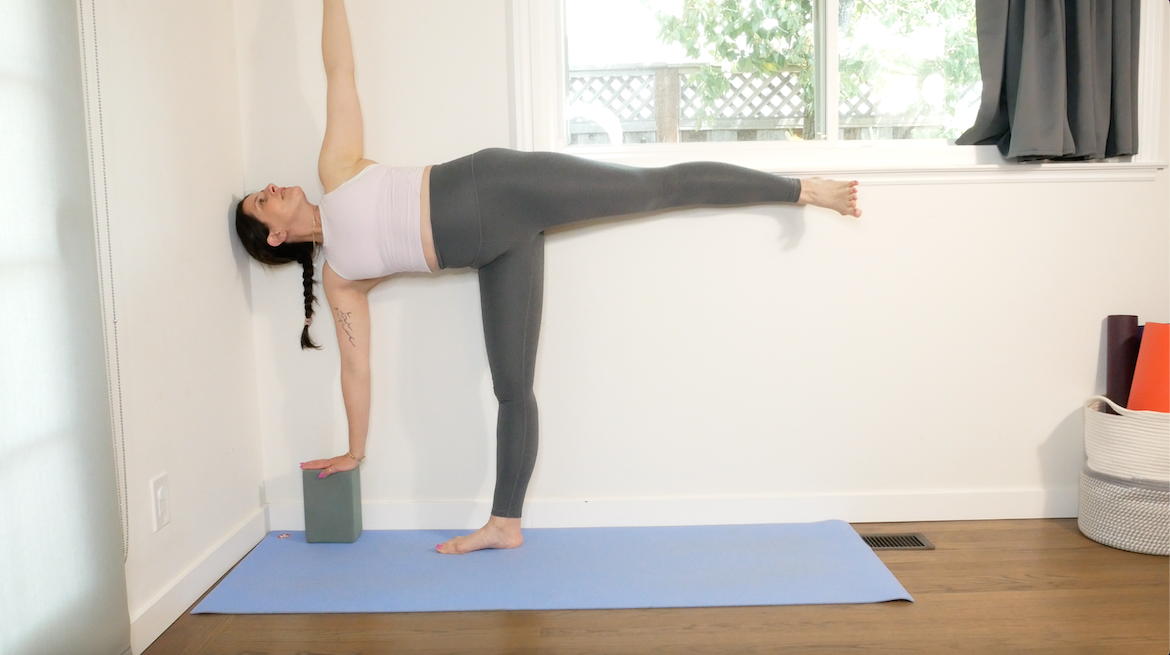
- Stand with your back against the wall and separate your feet three feet apart, setting up for triangle pose.
- Turn your right leg forward and angle your back foot and hip slightly inward.
- Reach your arms wide out to the sides.
- On an exhale, hinge at your hips and rest your right hand on your outer right shin.
- Look down and bend your right knee.
- Place your bottom hand slightly ahead of your toes on a block.
- Keeping your standing hip hooked against the wall, slowly lift your left leg toward the ceiling.
- Straighten your standing knee.
- Once balanced, trust the wall to support you and lean your upper body back against it. Perhaps reach your top arm to the sky.
- When you feel stable, you can look up to your top hand, or keep your gaze toward the floor.
- Remain for seven breaths.
- Come back through triangle pose.
- Lift your torso and parallel your feet.
- Repeat on your left side.
Bikram yoga half moon pose
Bikram half moon pose is the standing version of the side bend we mention above. This shape is sometimes referred to as crescent moon pose in other lineages.
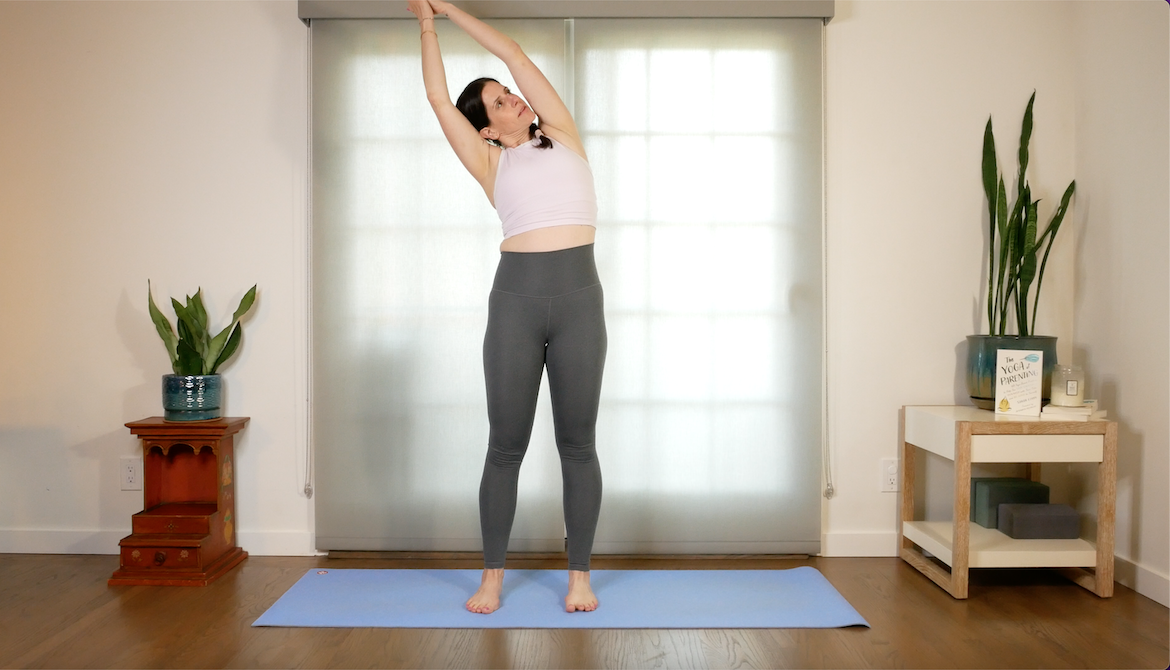
- Stand at the top of your mat with your feet together or hip-width for added stability.
- Inhale your arms up to the ceiling and touch your palms together.
- On an exhale, lean your torso toward the right.
- You can remain looking forward or look toward your hands.
- Hold for 10 breaths.
- Use an inhale to bring yourself back up to center and switch sides.
Half moon pose with a chair
There are quite a few ways to utilize a chair to help your half moon shine even more brightly.
Hand on chair
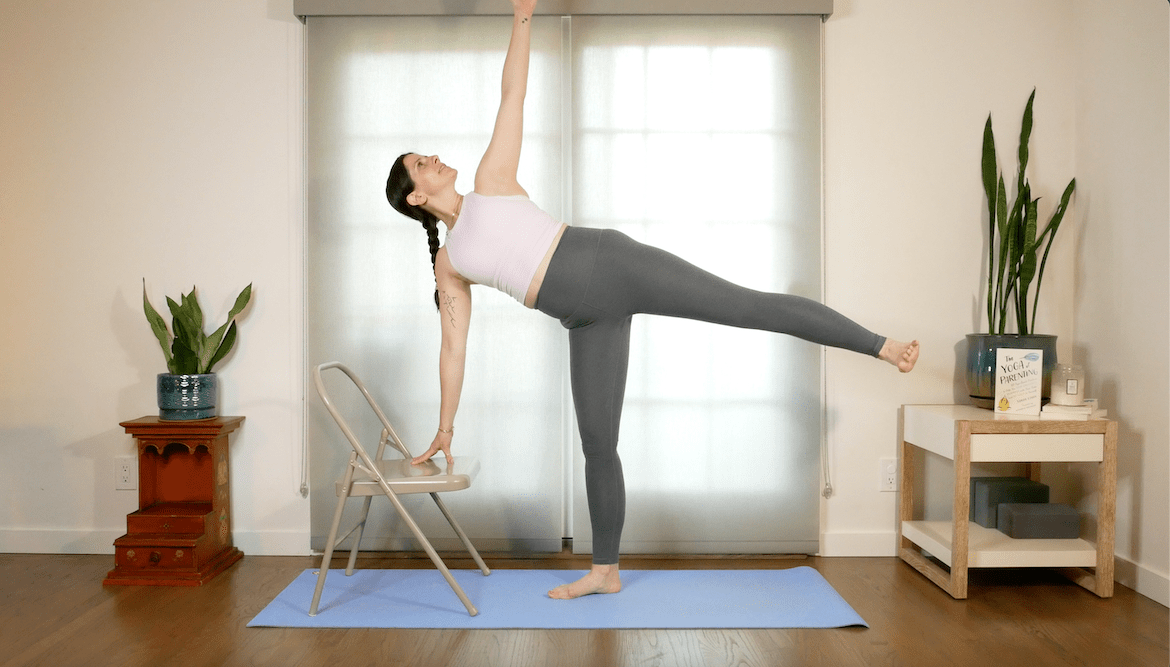 Sometimes a block is not high enough for us to feel stable and spacious, so Heyman prefers using a chair in his personal practice. “I struggle with poses that demand multiple things of my lower back and pelvis simultaneously, due to a degenerated disc in my lumbar spine. This adaptation allows me to find a more gentle way into the pose that feels supportive.”
Side bend in chair
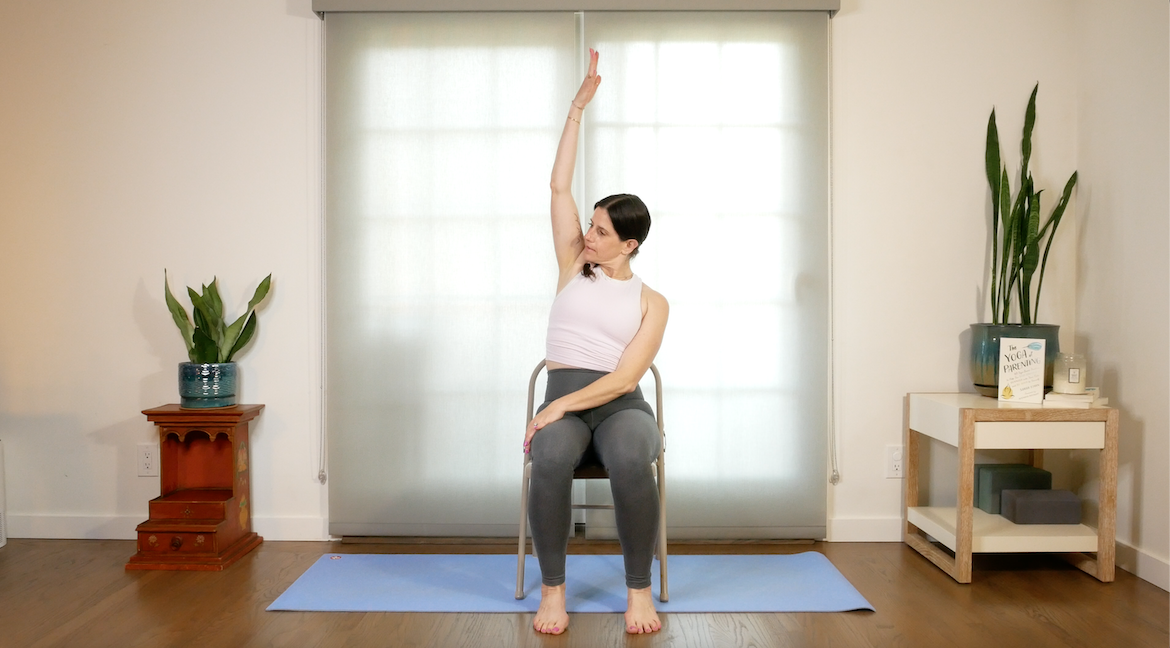
Kinter teaches the side bend version of half moon seated in a chair, and she jokingly prefers to call this version “banana-asana.” “It’s my favorite asana! I’m seated whenever I’m not laying down, which can cause my spine to get incredibly stiff and collect tension,” she says. “This version of half moon stretches the entire side of your body.”
Chapasana (sugarcane pose)
Once you feel confident in the classical one-legged balance shape, you can start to incorporate some flare. Sugarcane pose adds a backbend and front body stretch.
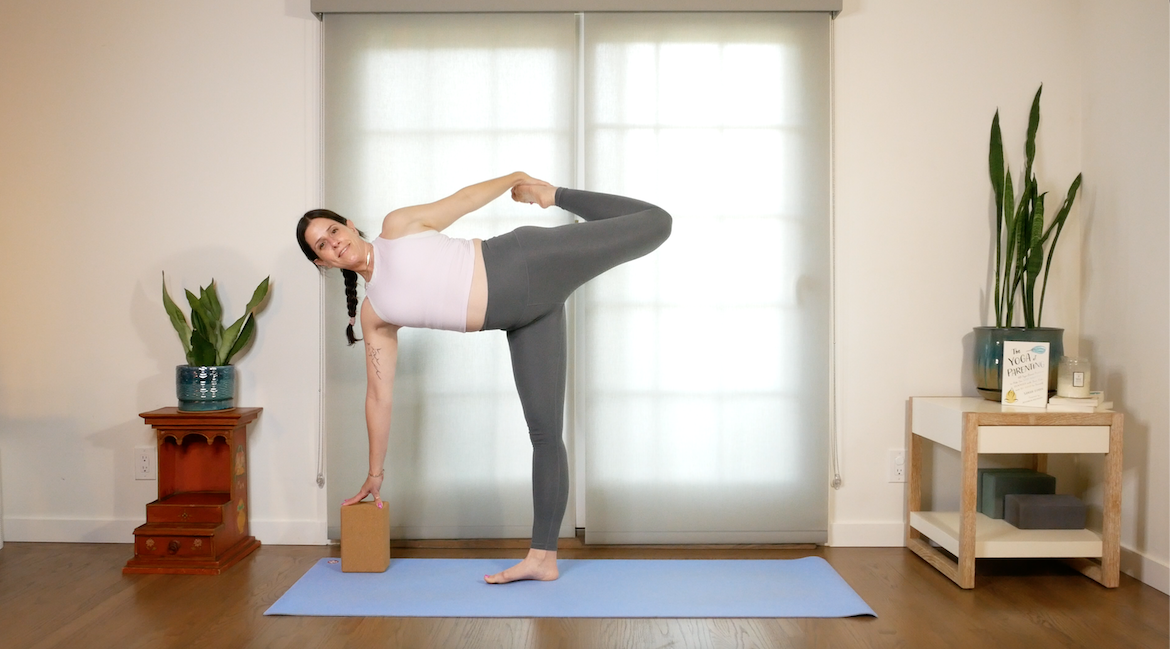
- Start in half moon pose on your mat.
- Bend your lifted leg as though you could kick your heel to your bum.
- Reach back with your left hand and grab the foot, ankle, or shin.
- If the foot feels incredibly far away, lasso a yoga strap or hand towel around it.
- Lean back to roll your chest open.
- Hold for five breaths.
- Let the leg go slowly (it can feel spring-loaded!).
- Return through half moon pose and either step back through triangle or come up to stand.
- Repeat on the other side.
Twisted half moon pose
Sometimes referred to as revolved half moon pose, this version is more of a cousin than a sibling. It’s a great variation for challenging balance and breath.
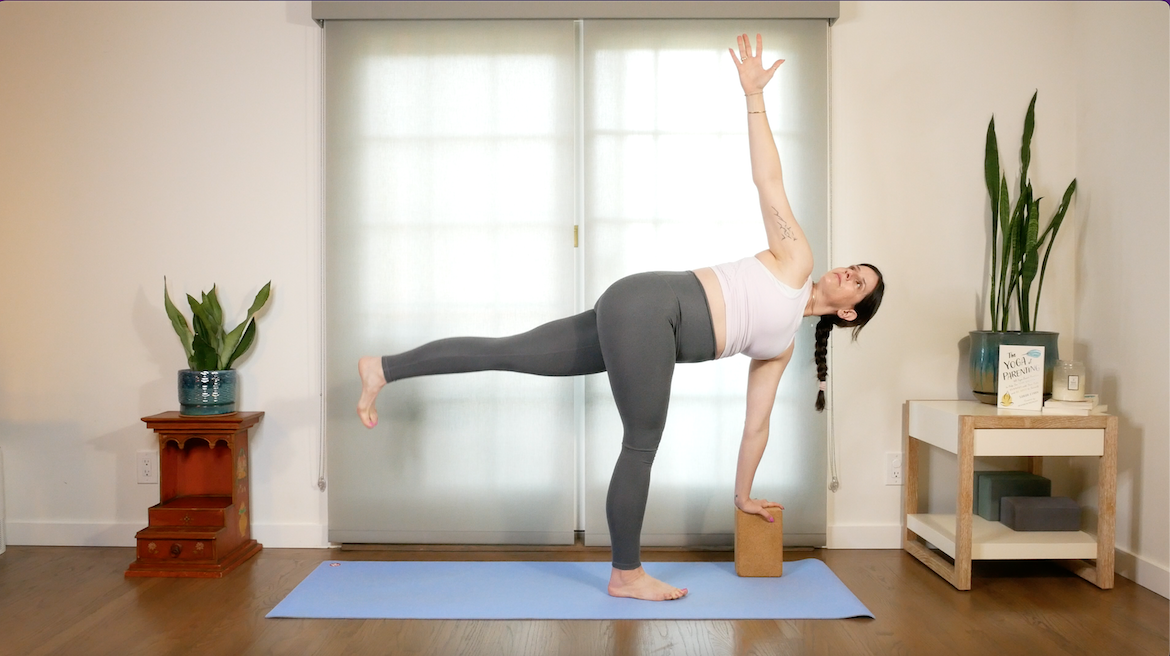
- Start in a runner’s lunge position, with your right foot forward and a block underneath each hand.
- On an inhale, push off your front leg and lift your left leg to hip height.
- Walk your blocks a few inches forward until they are directly underneath your shoulders.
- Keep your left hand on the block and bring your right hand to your hip.
- Take an inhale to lengthen your spine.
- On an exhale, begin to twist your torso open.
- Consider reaching your right arm up to the ceiling.
- Remain for five breaths.
- On an exhale, unwind your twist, bringing your hands back to your blocks.
- Step back into a runner’s lunge.
- Repeat on the other side.
Well+Good articles reference scientific, reliable, recent, robust studies to back up the information we share. You can trust us along your wellness journey.
-
Lau, Caren et al. “Effects of a 12-Week Hatha Yoga Intervention on Cardiorespiratory Endurance, Muscular Strength and Endurance, and Flexibility in Hong Kong Chinese Adults: A Controlled Clinical Trial.” Evidence-based complementary and alternative medicine : eCAM vol. 2015 (2015): 958727. doi:10.1155/2015/958727
Our editors independently select these products. Making a purchase through our links may earn Well+Good a commission.
