
YotaVerse LED 3rd Brake Light Kit Upgrade For 3rd Gen (2016-2023) Tacoma: Plug & Play Replacement With Smoked Lens – Install & Review
If you saw my recent post on the VLEDs footwell lights kit, you know that I love small mods that add a cool and personalized touch to a rig, but I also like my mods to be practical.
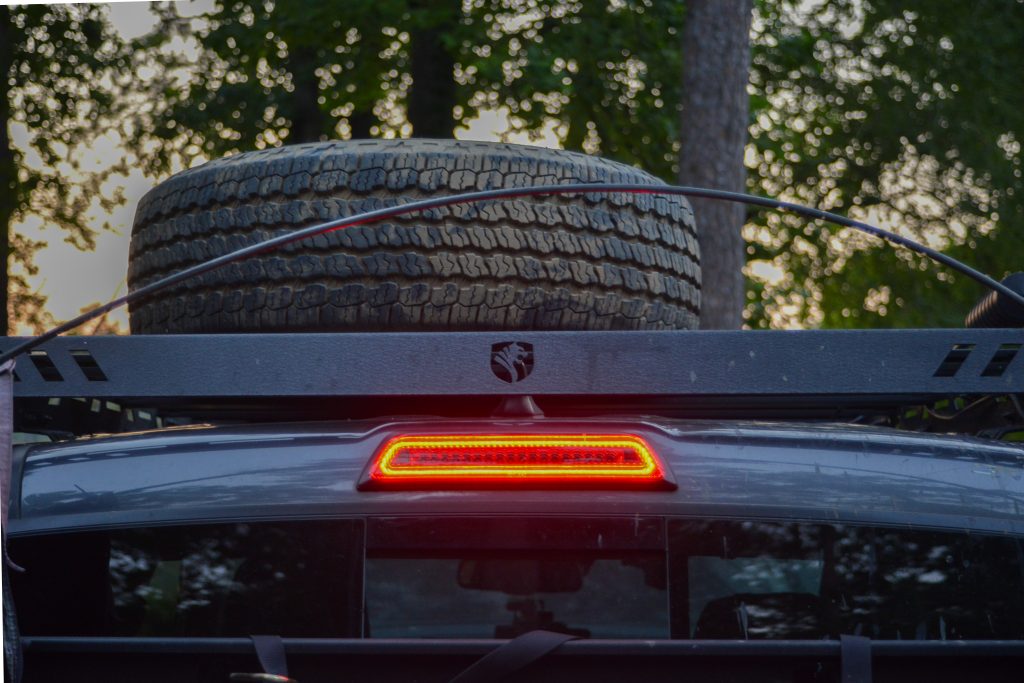
This YotaVerse LED 3rd brake light kit is another easy mod that does just this. I hate chrome, and this brake light has a smoked lens that looks great and matches everything else that I have blacked out on my truck.
This kit also offers a significant improvement in cargo/bed lighting than the factory light, making it a practical upgrade as well. The light features a full array of LEDs that provide ample bed lighting. I have found this extremely useful for packing/unpacking gear, tools, etc. in the dark.
This kit is a full OEM replacement and comes with everything you need for installation. The plug-and-play OEM wiring makes installation simple and straightforward with no electrical guesswork. This light is also fully weather-sealed.
In this post, I’ll go over everything you need to know about this kit. I’ll go over its features, installation, and my final thoughts after having it for several weeks now.
Find It Online
- YotaVerse LED 3rd Brake Light Kit (2016-2023) Tacoma: Check Price
Tacoma LED 3rd Brake Light Kit
Features

We’ve already touched on the simple install, the smoked-out lens/chrome delete, and the high-quality LEDs.
Here’s an overview of all the features this kit has to offer.
- Easy plug-and-play direct replacement
- Smoked-out lens/chrome delete
- Much brighter cargo area lighting
- Hyper-flash brake light when switched on
- Fully water sealed
- DOT/SAE Approved
The Hyper-Flash mode quickly flashes the brake light five times before fully lighting up when the brake pedal is depressed. This can be toggled on and off via a rocker switch on the back of the brake light.
Note: The rocker switch is hidden behind the light and can only be accessed by pulling the light back out again.

This kit is fully water sealed so you do not have to worry about water leaking in above the headliner. However, if the bolts are not properly tightened or your OEM gasket appears to be leaking, you may have an issue. I will go over how to prevent any leaks during the installation.
Other than a few basic hand tools, the kit comes with everything needed for installation. The wiring makes this easy for a beginner looking for a quick and simple upgrade that won’t break the bank. Also, the smoked lens makes this kit perfect for anyone looking for a full chrome delete and an aggressive look.
While both the brake and cargo lighting are significantly brighter with this kit, it is still DOT and SAE-approved for street/highway use.
Installation

Overall, this installation is fairly simple and took me around 15-30 minutes. The only difficult part for me was getting the headliner out of the way to access the bolts inside the cab.
The @wandertaco has made a great installation walkthrough video of this kit on his YouTube which you can find here.
What You’ll Need
- Plastic trim tools and/or pick set
- 8mm & 10mm sockets + corresponding ratchet
Step 1. Disconnect Negative Battery Terminal

Since we’re going to be removing trim near the airbags, it’s important to disconnect the battery. Setting off an airbag accidentally while removing interior trim can be dangerous and costly to fix. This is a good first step anytime you’re installing anything electrical too.
Step 2. Remove Rear Hooks & Grab Handles

While this can be done without any tools, I found it much easier to use a pick set and some plastic trim tools, both of which can be found cheaply on Amazon or at Harbor Freight.
Start with the back two hooks on the ceiling. Using your hands or a pick, pry up on each side of the cap on the back of each ceiling hook and pull off. Then, using a set of needle nose pliers or your fingers, pinch the metal plug and pull it out to remove the hook and set them off to the side.

Now, start removing the rear grab handles. Like the ceiling hooks, there is a plastic cap locking the handles in place (two on each handle). Pry them up with a pick and pull them off.
Then, using a set of needle nose pliers or your fingers, pinch the metal plug and pull it out to remove each side of the handle and set it off to the side.
Step 3. Remove Rear Pillar Trim & Pull Down Headliner

To pull the headliner down and access the back of the 3rd brake light, the rear pillar trim must be pulled off. There is an oval SRS airbag badge above each seatbelt on the rear pillars. Use a plastic trim tool to gently pry these off.

You should see a 10mm bolt that was hidden by the airbag badge. Remove this bolt with a ratchet on both the driver and passenger sides.

With the bolts removed, you should be able to gently pry the pillar trim off. There are several plastic clips that will pop out but do not try to force it. Start by prying and pulling the trim off at the top and working your way down.

You do not necessarily have to fully remove the trim, but pull it off to where you can pull the headliner down. Pull the headliner down until you access the holes and bolts on the upper backside of the headliner.
Step 4. Remove OEM 3rd Brake Light

With the headliner removed, we can now access the bolts that secure the 3rd brake light. Remove the two 10mm bolts above the middle sliding window. They are recessed slightly inside the sheet metal in the roof so you may need a deep well socket and/or a socket extension.

With the two nuts out, go around to the other side of the light in your bed and pull it out. It may be stuck in at first so a plastic trim tool may help pry it out.

When you pull the light out, it will be connected by a single wiring harness. Unplug this and leave the harness hanging.
Step 5. Toggle Hyper Flash Switch To Desired Setting

With the old brake light out, it’s time to prep and install the new light.
Before installing the new brake light, toggle the rocker switch on the back of the light to your desired mode. Switching it to the “on” position will turn on the Hyper Flash mode. When switched to the “off” position it will function as the OEM brake light.
Next, I cleaned the gasket and the area around the brake light with a damp rag to ensure everything seals properly.
Step 6. Install New Brake Light

Take the new brake light and plug the factory harness into the back of the light. Then, install the YotaVerse brake light, ensuring the bolts align properly with the holes and that there is a snug fit. Ensure the outer seals are flush with the paint.

From here on out, you pretty much just have to reverse steps 1-4 to reassemble everything.
The YotaVerse kit comes with two 8mm nuts that you will bolt to the back of the light the same way you unbolted the OEM light. Again, you may need a deep well socket and/or socket extension in order to reach the bolts from the other side.
Make sure that the nuts are tight. This will ensure that the seal is tight up against the paint and will not leak. If one or both nuts are loose, it may cause a gap in between the light and the body panel where water could seep through.
Step 7. Reinstall Headliner, Trim, & Reconnect Negative Terminal

Like I said, pretty much follow steps 1-4 in reverse to reassemble everything. Push your headliner up to the correct position and then snap the pillar trim back into position.
Next, reinsert the two bolts securing the pillar trim and place the SRS airbag badge back over the bolt holes.
Then, reinsert the ceiling hooks and grab handles by placing each in their respective holes, inserting the metal squeeze clip, and placing the plastic cap back on.
Lastly, hook your battery back up and have a buddy press the brake pedal to ensure the brake lights are working properly. Try out the cargo area lighting by flipping the switch on the left-hand side of the steering wheel (a.k.a. jellyfish launcher switch).
Final Thoughts

Overall, this kit not only works and looks great, but is simple to install and works seamlessly with the OEM wiring.
I would recommend this kit to anyone looking for a simple and cost-effective way to improve the look of their truck and upgrade the cargo lighting. Since I’ve been on a mission to delete every inch of chrome on my truck, this kit was like a cherry on top to finish off my blackout look.
I will admit, I was somewhat worried that this light was not fully sealed and would leak above my headliner. After installing this brake light, it ended up raining heavily for the entire week, about 1-2” every day. I park outside at my house and at work and did not have a single leak.
As I said previously, I have found the upgraded cargo lighting extremely useful. For one, it is great for packing/unpacking overlanding and camping gear in the dark after a night ride. For those that have seen my post on my Milwaukee Packout overland tool storage, then you know I keep my toolboxes in the bed of my truck. The upgraded lighting makes it easy to find the right tool I’m looking for in the dark. It’s also bright enough to use as a work light when using my tailgate as a workbench or cooktop.