Universal Budget Backup Camera From Amazon: How Well Has It Held Up? Overview & Long-Term Review – Mounted In 2nd Gen Tacoma
Backing up with a truck can be hard, especially if you have a canopy or it’s dark outside. Cameras definitely help, but popular options can cost anywhere from $100 and up. If you’re on a tight budget, can a universal backup camera for under $60 stand the test of time and get the job done?
There are dozens if not hundreds of universal cameras on the market. Budget backup cameras are typically between $25 to $100, but are they worth it? I was given a LeeKooLuu camera as a gift from my Dad and I had no idea how well it would work. However, after using this camera for roughly 3 years, I would say it’s done well!
Find It Online
Amazon Backup Camera Review
What’s Included
- 4.3″ Monitor
- Camera
- Suction Cup
- (2) Power Cords
- Cigarette Lighter Adapter
- Instructions
- Wiring
The kit comes with enough wiring to set up the camera in a couple of ways. I set up the camera to turn on when I shift into Reverse and turn off when I shift out of it. The camera and monitor pull power from the reverse light.
All of the wiring required (with ample extra wire length) as well as splitters to power the system are supplied in the box. Alternatively, you can use the supplied wiring to tap into the cigarette lighter and power the system on demand.
Installation

Tools Required:
- 10 mm Socket & Ratchet or Wrench (to remove tail light)
- Zip Ties (for cable management)
Recommended Tools (Custom Wiring):
- Razor Blade & Silicone
- Soldering Iron & Solder
- Electrical tape
Installation is pretty straightforward but could be improved. Either tail light can be used and removed via two bolts (top and bottom) on the face of the truck bed where the tailgate latches. Once the tail light is removed, the camera can be wired to the light.
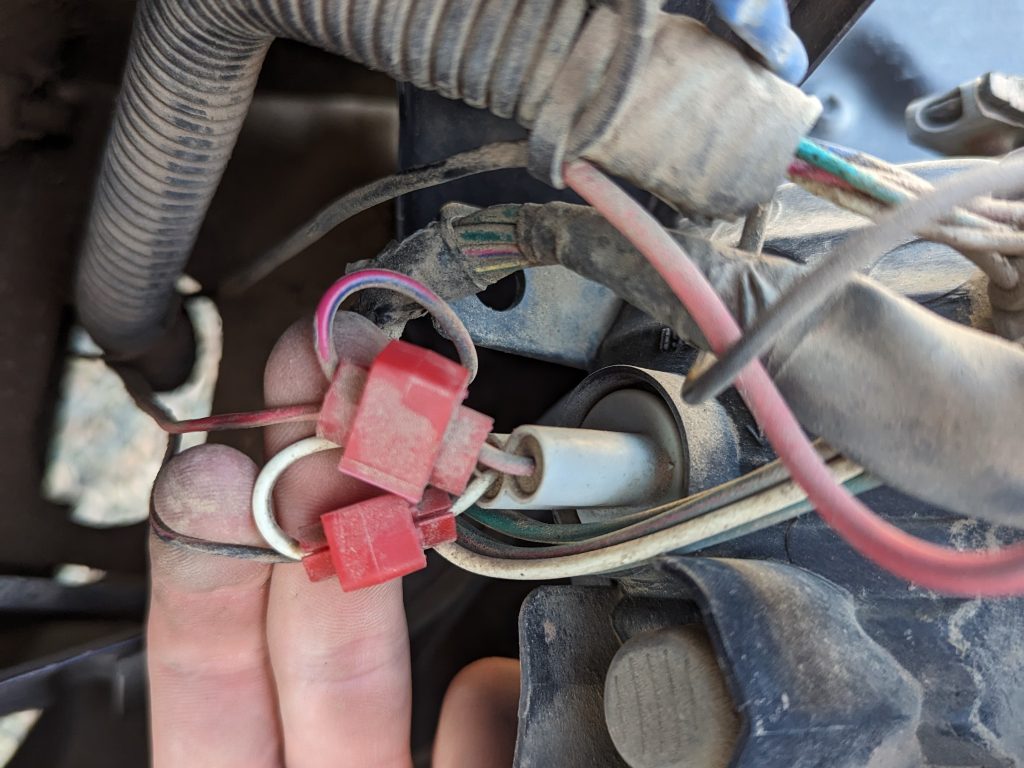
The red wire of the camera (positive) is spliced onto the red wire on the truck (the reverse light power) and the black wire from the kit (ground) is spliced onto either white with a black stripe (tail light ground) or any other ground on the truck.
Once those two wires are connected, your camera should work! Next, reinstall your taillights and run the wiring to wherever the display will be mounted in your cab. The camera gets bolted onto your license plate frame and is very out of the way, which is nice.
2nd Gen wiring may vary. Check out our guide – brake, reverse, turn signal wire tapping guide.
I would like to mention an improvement. The quick splice wire connectors that come with the kit work but over time may fail. I’ve experienced that sometimes they get bumped around and the camera doesn’t get power to come on. This started after about a year of use.
If you are handy and have a soldering iron, this is an easy fix. Stripping part of the wires and soldering on the power and ground as mentioned above will keep the wires much more secure with better continuity.
Routing Wires

I ran the wire from the camera into the hole to lower the spare tire (between the tailgate and rear bumper) and along my frame rails. I used zip ties through the holes in the frame rails to hold the wire away from the ground, hot exhaust, and moving components such are wheels or driveshaft.
Once the wire is underneath the driver floor pan, there is a rubber wire grommet that I lead the wire through after making a small hole in it and sealing it using silicone. The wire then comes out underneath the driver seat and can be routed underneath the plastic cover on the door sill, behind the dash, and out near the radio.
Since I have an aftermarket radio, there is a little bit of space where the wire for the monitor fits perfectly.
My Setup

My setup isn’t perfect and I would like to improve it by replacing the dash mount. However, it’s gotten the job done for the past 3 years.
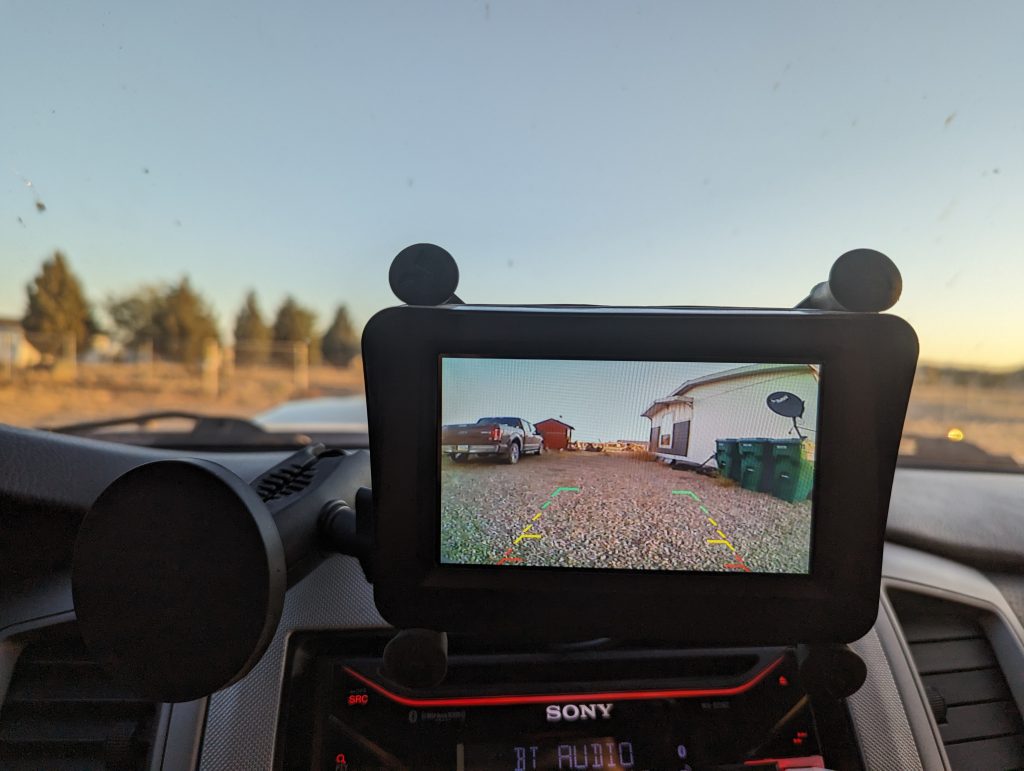
I chose to use a RAM mount to hold the monitor because I had a spare one, it was easy to set up with my existing dash mount, and I am not a fan of suction cup mounts for anything. In my experience, suction cup mounts give away when it gets too hot or cold. Taking my truck in 10° conditions in the Cascade mountain ranges and 110°+ conditions in Phoenix, AZ, I wanted a better solution. The RAM mount isn’t a perfect fit, but holds the display tight.
Managing the wires as I have, they stay out of the way and leave enough slack that if I readjust the monitor it can move without putting stress on anything.
For a budget backup camera, this unit has a good amount of customization, letting you adjust the in-picture guidelines, brightness, contrast, tint, and aspect ratio. This can dial in your setup so the picture looks best.
One downside is that it doesn’t auto-adjust anything, so backing up with the camera facing the sun and backing up in the dark is going to require different adjustments for optimal visibility. I leave mine adjusted for daytime light without sun-glare so it looks decent in all conditions.
Final Thoughts

The kit is a pretty good value for the quality of the components. It’s also one of the best modifications I have added to my truck. My main complaint about the setup is the quick splice wire connectors. While they work just as well as any other quick-splice wire connectors, they’re not perfect. For example, they can get bounced around to where they randomly have a poor connection causing the camera and display to lose power.
The two fixes are wiring it through the cigarette lighter for on-demand power or soldering the wires on as mentioned earlier. I opted to solder the wires and with that, there’s very little to complain about for a $50 system.
I have fully gotten used to the location of the display after a week and it’s out of the way enough for me while driving. A cleaner solution, though, would be wiring in a mirror backup display as in the newer 2nd Gen Tacoma (2011-2015), but that is a costlier and more intensive mod.
Backup cameras are a lifesaver for getting out of cramped parking lots, backing down long driveways, and countless other situations. Is it worth it to get one for your truck? Yes, it absolutely is.
Is this backup camera worth getting? If you are looking for a budget option, it’s a solid choice. The display, camera, and wiring are very good for the price. The one downside is the use of quick splice connectors they’re unreliable connections.
Overall, this kit is worth it in my book. It gets the job done, is easy to install, and has decent image quality for the price. Sure, there are better options out there but for the price, this is solid and hasn’t left me disappointed.

